And now for dessert, because it’s already too late in the season for that beach body anyway.

There’s nothing like getting up early to attend a boot camp gym session, walking to Whole Foods for a delicious and healthy bottle of citrus kombucha, only to come home and negate the entire process by making an entire tray of brownies for lunch. Continuing in that vein, my mom and I decided that today was a day for a dessert recipe — we will take a short break from cabbage this week. Fear not! It will probably be back in one fashion or another next week. However, since today my sweet tooth is insatiable, I give you: Czar Cake.

My mom loves this recipe because it’s incredibly low-maintenance on the supplies end of things. If you have an electric mixer, eggs, butter, and sugar, and a can of cranberry sauce or a tart jam, you’re in business. She throws this together for last-minute dinner parties and all of her guests are impressed and flattered that she would go to “so much trouble” to make dessert from scratch. This recipe is basically the equivalent of throwing on a dress and having everyone tell you how nice and put together you look. It’s one item of clothing. It took four and a half seconds. With the exception of whipping egg whites into peaks, this recipe is nearly as painless as putting on a dress.

Czar Cake

200 grams butter (or 1 ¾ sticks), room temperature (very soft)

1 1/4 cup sugar, divided

3 eggs, yolks separated from whites

1/3 tsp baking soda

2 cups flour

¼ teaspoon cream of tartar powder (optional)

6-7 oz tart jam (eg: lingonberry, black currant) or cranberry sauce

Separate the yolks from the whites. Cover the whites with plastic wrap and set back in the fridge for 20-30 minutes (they will peak more easily when cold).

Preheat oven to 280 F.

IMG_2112

Mix flour, butter, ¼ cup sugar, egg yolks, and baking soda together. This part is easiest to mix by hand. On an ungreased 9″ x 13” baking pan, flatten the dough by hand so it is thin and consistent across the pan. Try to get the dough all the way to the edges. This will be a good measure of just how thin the dough needs to be. Set the pan into the fridge while you are doing the next step.

IMG_2111

Beat one cup of sugar and the egg whites together with an automatic mixer until stiff peaks form (about 10 minutes).  A nice trick to get the peaks to form is to add a ¼ teaspoon of cream of tartar powder. To test if it’s properly mixed, try a little of the mix — you should feel no graininess from the sugar on your tongue.

Once they are beaten, set them into the fridge and pull out the pan with the dough. Spread a thin, translucent layer of jam evenly across the dough. It is very important to keep the layer thin, or the cake will come out soggy. Don’t be afraid to see the dough through the jam – this ensures that the layer is not too thick!

IMG_2113

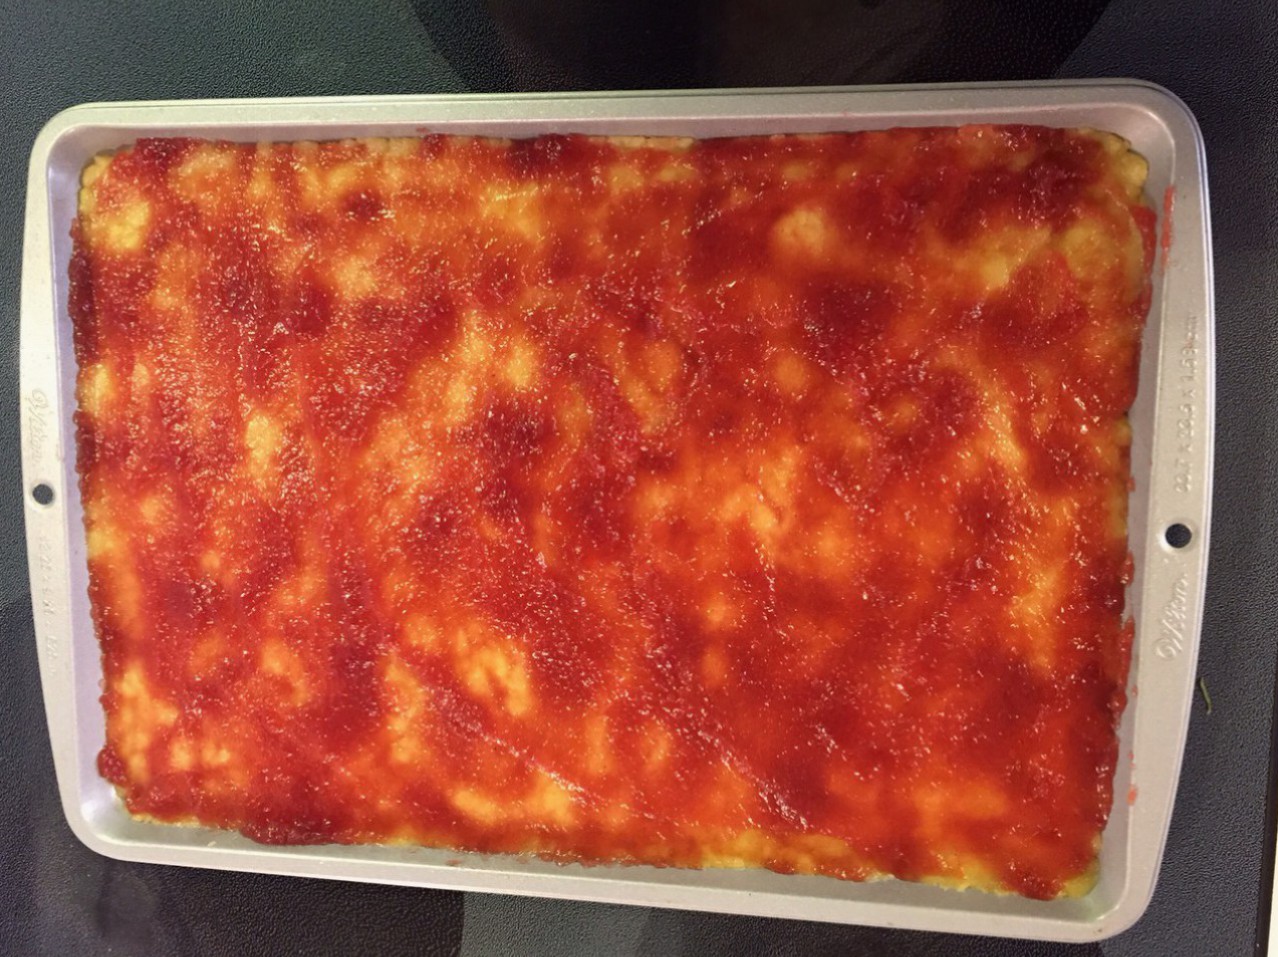
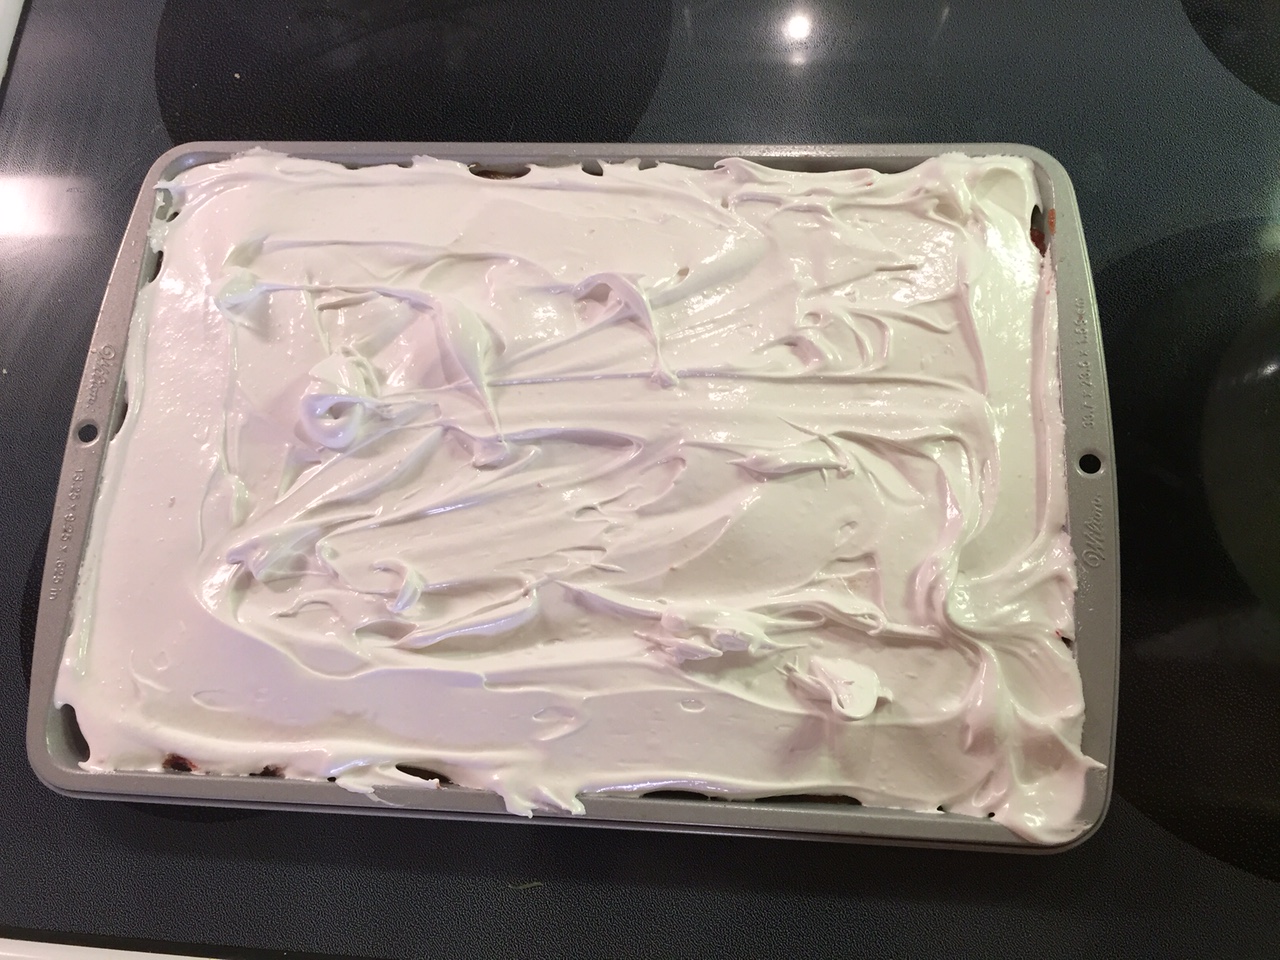
Top the jam layer with the whipped egg and sugar blend. As with the previous two layers, this layer should also be fairly consistent in thickness and coverage. Don’t be afraid to go all the way to the edges of the pan. A nice visual touch is to allow “waves” or swirly shapes to remain in the top layer – it will look nice when it comes out of the oven.

IMG_2116

Set cake into the preheated oven for one hour. Once you remove the cake, cut it into 2-inch squares while hot, on the baking sheet. Do not transfer to another plate or board for cutting! Let the cake cool completely, uncovered. Leaving it uncovered is another step in making sure it dries to the correct consistency and doesn’t become soggy.

Enjoy with a cup of tea or a glass of cognac — you know, like the czars would. Obviously.

Golubtsi — meat swaddled in a cabbage leaf, like a tiny delicious baby.

Ah, cabbage, that ubiquitous vegetable cultivated for the last 1000 years in every country where it’s too cold to do anything outside for at least six months out of the year. I will not deny that we Russians love our cabbage, but it is a love that was born out of necessity, and at the risk of escalating into boredom, creative approaches were taken with the preparation of this most noble of leafy heads. But I digress.

Golubtsi (golubetz in the singular) are not a far cry from how I described them in the title — little handfuls of a mixture of beef, pork, and veal, mixed with rice and onions, lovingly wrapped into a cabbage leaf that’s been pounded into submission by a meat hammer. This is not an easy recipe, per se, only in the sense that there is a fair amount of preparation involved. You’ll notice many Russian recipes are like this, and it primarily stems from the fact that spending half of a day on one food project makes all the sense in the world when it’s -20 F outside and you’d rather not spend 12 hours on Netflix, binge-watching The Office. (Shut up, you don’ t know my life.) So, without further ado:

Golubtsi

2 ½ lb beef/pork/veal ground meatloaf mix (you can grind your own meat if you feel inclined, but who wants to do that? Just buy a high-quality meat mix and call it a day)

1 cup rice (uncooked)

1 large onion

1 head of cabbage

Salt/pepper to taste

½ cup parsley, chopped

Oil for sautéing

Prepare the cabbage first. There are two ways to do this:

  • Place a whole head of cabbage into a large pot filled with boiling water. It is ready when you insert a knife into the cabbage with no give.
  • Place the cabbage into a plastic bag and put it in the freezer for 48 hours. Then, defrost overnight and in the morning the cabbage will be soft and pliable.

Rinse the rice until the water runs clear. Pour the rice into a pot with 4-5 cups of water. Cover and bring to a boil. Then cook on medium heat, uncovered, for 10 minutes. After 10 minutes it will still be in a lot of water and be “al dente” to taste. Drain, rinse with cold water, and set aside.

After preparing the cabbage using either of the aforementioned steps, place the head on a cutting board with the core side up. Cut it out carefully using a long sharp knife. Try not to destroy the surrounding leaves. Leaf by leaf, gently take apart the cabbage. Each leaf will be your wrap for the recipe, so try not to tear any.

Take each leaf and use a sharp knife to thin the thickest part of the main vein, to make the whole leaf more uniform in thickness. Be careful with this step too, so as not to cause any holes or tears in the leaf (think of the meat babies!). Take a meat mallet and pound out each leaf along the vein on a cutting board until they are flat. You need the leaves to be almost rag-like in order to wrap them around the meat and rice later. They will be wrapped with the vein encircling the center of each golubetz, so they must be flat and easy to wrap.

Dice the onion and sauté over oil of your choice in a large saucepan, on medium, until they become golden brown. In a large bowl, combine onion, cooked drained rice, raw meat, and chopped parsley. Season with salt and pepper. My mom, being an incredible badass, tastes the raw meat mixture with the tip of her tongue to see if it is seasoned well enough. I will not judge you if your fear of food-borne illnesses prevents you from doing the same.

Grease a large roasting pan (my mum uses this incredible brand, but if you want to be price-conscious, this will do just as nicely) with oil or cooking spray (your choice), and preheat broiler to 450 F.

On a cutting board, lay the cabbage leaf flat with the bottom of the vein towards you. Take a small handful of the meat mixture and place it in the lower center of the leaf, and slowly roll up the leaf around it:
IMG_2066

Halfway up, fold the left and right sides in (similar to how grape leaves are stuffed):

IMG_2065

Continue to roll the cabbage leaf up until the last bit of leaf is wrapped around the meat:

IMG_2067

Then, carefully place it with the flap side down into the pan. Repeat, placing each wrap neatly in the bottom of the roasting pan side by side, until the meat mixture is used up.

IMG_2064

TIP: This recipe yields roughly thirty golubtsi. If you have leftover meat, and don’t want to make more than one pan worth of golubtsi, you can freeze the excess raw golubtsi and cook them at a future date. They will keep in a freezer for four to six weeks.

Brush each golubetz with oil, and place in the broiler for five minutes. After five minutes, remove the pan, turn each golubetz over carefully, and cook for five more minutes in the broiler.

While the golubtsi are cooking, you can make the sauce for the next step:

4 garlic cloves, finely chopped (if you don’t love garlic, you don’t have to use it in this recipe, but I will respect you less for your hatred of the magnificent garlic bulb)

3 stalks of celery, thinly chopped

1/3 cup parsley

2 28-oz cans of whole peeled tomatoes (or equivalent tomato sauce if you prefer a smoother sauce)

Salt/pepper/sugar to taste

Lemon juice

Sour cream

Heat a saucepan with oil on medium heat and add garlic. As soon as the garlic becomes aromatic, add celery, stirring constantly. Add parsley and cans of tomato, “chopping” the tomatoes with your spatula, or conversely, chopping them ahead of time in the can/on a cutting board. After cooking for about 10 minutes, taste and add sugar, salt, or pepper as needed. Add a fresh squeeze of lemon juice (about half a lemon’s worth). Continue to simmer for 15 to 20 minutes.

Right before taking the sauce off of the heat, add three tablespoons of sour cream to the sauce and mix well.

Remove the pan of golubtsi from the broiler and pour the sauce over top, covering the golubtsi completely. Cover the pan tightly with foil. Set it into the oven at 350 F for 45 minutes.

Serve immediately; they can also be easily reheated the next day. These also freeze very well for future “TV dinner”-style eating.

Traditional Russian Schee, because soup is for all occasions.

Long before I was a fervent devotee to all things delicious, I was a scrawny immigrant kid in a new country who wouldn’t eat a thing unless it was a raw fruit or vegetable. My mother took one look at my skinny limbs and decided she had to get food into me at all costs. I wouldn’t eat meat because the consistency and fat freaked me out, I wouldn’t eat anything with sauce or dressing, and if I so much as got a sliver of chicken in my rice or pasta I pushed the plate away, horrified. Huge wonder, now, that I am not a vegetarian, having somehow rid myself of the fear and loathing of animal meat. A big part of this transformation had to do with my mom’s clever application of Pennsylvania beer to the beginning of every dinner (just four ounces of Penn Pilsner, Sam Adams, or Yuengling) to fuel my appetite. The other part? Soup.

Russians will eat soup in any weather, at any time of year, for any meal of the day. We live on all kinds of soups, and I’m sure I’ll be giving you all many more soup recipes as this blog progresses. All of our soups are made with homemade stock, and though we have vegetarian options, most traditionally beef or veal is the base. This is how my mother managed to keep me alive — by cooking every manner of soup. Today’s recipe is called Schee, which is a traditional cabbage soup. It’s packed with vegetables, the chopping of which is the biggest chunk of work. Once the veggies are chopped, it’s pretty smooth sailing.

Ingredients for the SCHEE:

4 liters of broth of your choice (the recipe for traditional beef or veal broth is just below)

½ head of large white cabbage, chopped lengthwise and then crosswise (the way you would prepare for coleslaw)

1 parsnip, peeled, quartered, and chopped thinly

2 carrots, peeled, quartered, and chopped thinly

1 yellow onion, peeled and diced

3 large or 4 medium-sized potatoes, peeled and diced

1 whole stalk of celery (about 5 sticks), chopped thinly

3 Roma tomatoes, diced

1/3 cup dill, chopped finely

2 tablespoons of olive oil

2-3 bay leaves

For garnish: sour cream, dill, green onion

Boil broth of your choice. Traditionally, this recipe is made with beef broth or veal broth. The recipe for this broth, if you want to make it from scratch (which always tastes better than a store-bought brand anyway) is below:

To yield 4 liters: Use a sugar bone or marrow bone with meat on it. The bone is necessary, because the gelatin and cartilage is important to give the broth body and texture. Bring to a boil, then reduce heat, take the foam off with a ladle or large spoon, and reduce to simmer.  Add ten peppercorns and 1 1/2 tablespoons of salt. Add two carrots and a parsnip, whole or roughly chopped. Add one onion, quartered.  Simmer for two hours on low heat. Strain into another pot. Everything can be discarded except for the meat. (For this recipe, you’ll chop the meat finely and reserve for the Schee.)

PRO TIP: This broth recipe can be made ahead of time and can be frozen for up to three months. Our suggestion is to divvy it into small containers or freezer bags so you can have it portioned out ahead of time. To defrost, toss the contents of the bag or container into a pot over medium heat.

While your broth is simmering, prepare your vegetables for the Schee (cabbage, parsnip, carrots, onion, potatoes, celery, tomatoes, dill). With this soup, it is important that everything is chopped rather finely, so you can have the perfect bite which incorporates all the flavours of the soup, every time. Here is the ideal way to chop the cabbage, in steps:

IMG_1956IMG_1960IMG_1957

Heat oil in a large saucepan. Add carrot, parsnip, and celery, and sauté until slightly golden, about 10 minutes. Add onion and mix well. If it begins to feel like your vegetable mix is too dry, add another teaspoon to a tablespoon. Sauté for another five minutes, then toss sautéed veggies and chopped potatoes into the simmering broth and let simmer for fifteen minutes. Add in chopped meat from the broth recipe. With the leftover olive oil in the pan, sauté the tomatoes for about 10-12 minutes over medium heat, until they start to fall apart. (The purpose of the tomatoes in Schee is not so much about flavour as it is about colour. The soup must take on a red-gold hue when it is finished. More on that next.)

IMG_1961

Add the cabbage and sautéed tomatoes to the pot and increase the heat. With a ladle of broth, glaze the tomato skillet so the broth takes on some of the red colour. Then, pour it back into the soup. Bring the soup to a boil, and remove the resulting foam from the cabbage by skimming it with a large spoon. Add dill and bay leaves at this point, and reduce the heat. Allow the soup to simmer for another five minutes.

IMG_1962

As with most soups, this can be served immediately or reheated later. Top each bowl with a dollop of sour cream and a sprinkle of dill and/or green onion.

“Cooking, drinking, and keeping track of all the things I forget how to cook after I sober up,” or, “a haphazard archive begins”

I signed up for a farm share at the beginning of June, and every Wednesday I get a lovely box of local vegetables and a dozen local eggs. The farm share has been doing exactly what I had hoped, which is stretching my culinary capacities and encouraging me to step outside of my cooking comfort zone and work with what is given to me instead of buying the same old ingredients at Whole Foods every week.

Another thing I’ve been meaning to do is to record my mom’s recipes, both traditional Russian ones and others she has adapted from living in the States for the last two decades. Since my visual art has been in a partial stagnation, but my cooking and cocktail-inventing has been on the rise, my blog will be devoted to the latter two creative practices for the time being. Today is a day for mom’s recipes, since it’s my birthday and naturally I should surround myself with the things that make me feel the safest and happiest, not least on that list being my mother’s cooking.

Today’s recipe from my mom: Quick-Pickled Cucumbers

IMG_1914 IMG_1913 IMG_1915 IMG_1916

Everything is made inside of a 1 gallon jar so that no ingredients are wasted and the proportions can be right every time. The following amounts are based on a 1 gallon jar, so adjust accordingly if you will be working with a smaller or larger jar.

10-15 mid-sized cucumbers (less if they are large in size, but mid-size or small are recommended) / approximately 3 pounds of cukes

8-10 garlic cloves

1 branch (5-8) black currant leaves (If you don’t live in an area where you have access to fresh black currant leaves, the cut and sifted version will do — you can order it here on Amazon.com)

1 large bunch of dill, preferably dill that has flowered already

1 small bunch parsley

20 black peppercorns

1 teaspoon of pickling spices (should include clove)

6 heaping tablespoons coarse salt

1/3 teaspoon of anise seeds

1 horseradish leaf or 1 tablespoon of horseradish

Chop off both ends of each cucumber. Soak cucumbers overnight in cold water. If you want to make this recipe same-day, you can soak them for a minimum of five hours.

Set eight cups of water to boil on the stove and add the 6 tablespoons of salt.

To the jar, one at a time, add: black currant leaves, parsley, dill — chop the garlic cloves into slices for greater aroma and add a few into the jar. Add horseradish leaf, torn, into can — if unavailable, use a tablespoon of horseradish.

Place cucumbers into the can in layers, alternating cucumbers and the above ingredients. NOTE: If cucumbers are larger than midsize, it is recommended to stab them in the middle once or twice with a sharp knife so that the pickling flavours can soak through adequately.

Dill leaves/stalks can be thrown whole into the jar. Don’t be afraid to pack the layers with cucumber tightly, but not enough to squish or bruise the vegetables. 

If you want your pickle mix to be spicy, add a half teaspoon of red pepper flakes.

Using a ladle over the sink, pour boiling hot water over the full jar, and cover lightly with the lid. Let it sit on the counter overnight. In the morning, you can enjoy the pickles fresh or close the jar completely and refrigerate. Your pickled jar can sit for a month if kept refrigerated.

IMG_1917 IMG_1918

You can eat the pickles on their own or, if you’re feeling traditional, you can pair them with boiled potatoes sprinkled with fresh dill and pickled herring — and of course, a shot of quality vodka. 😉